Where is my Teams' Meeting Recording Saved?

Lost track of your Teams meeting recordings? Don’t worry, we’ll help you find it!

Where does a meeting recording go when you have a meeting in Microsoft Teams? Well, that depends on two things.

Introduction: Understanding Microsoft Teams Meeting Recordings

Quick Overview of Teams Meeting Recordings

When you record a meeting in Microsoft Teams, finding it later shouldn’t be a treasure hunt.

Understanding where your recordings are stored can save you time and frustration, especially when you need to reference important discussions or share them with colleagues who were unable to attend.

Your Teams recording location depends on how you held your meeting:

  • Channel meetings: Recordings from meetings held in a Teams channel
  • Chat meetings: Recordings from meetings held in the Chat area of  Microsoft Teams

What We’ll Cover

Let’s keep this simple! In this article, I’ll show you:

  • Where Teams actually stores your recordings
  • The fastest ways to find them when you need them
  • Easy steps to locate both new and old recordings

I’ve seen so many people waste time hunting for their meeting recordings. By the end of this article, you’ll know exactly where to look, whether it was a channel meeting or a chat meeting.

No more frustration, just quick access to those important conversations when you need them!

Ready to make your life a bit easier? Let’s get started!

Locating Teams Meeting Recordings from your Channel Meetings

Locating Recordings from Channel Meetings
Meeting within a Teams Channel

Quick Steps to Find Your Teams Meeting Recording

Need to quickly find that Teams meeting recording? Here’s the simplest way to locate recordings from your channel meetings, no digging through SharePoint required! Just follow these steps and you’ll have your recording in seconds.

  1. Open Microsoft Teams
  2. Click the Teams icon on the left sidebar (or Chat icon if your Teams and Chats are combined)
  3. Select your Team
  4. Choose the channel where the meeting happened
  5. Look for the meeting post
  6. Click the meeting
  7. Select “Recap”

That’s it! You’ll now see your recording.

Two Easy Ways to Watch a Teams Meeting Recording

Once you’ve found your recording, you have two simple options for watching it, each with its own advantages depending on what you need.

Option 1: Quick View in Teams

Just click the play button, and your video starts playing right in your Teams window, perfect when you just need a quick refresher on what was discussed.

  • Click the play button
  • Video plays right in your Teams window
  • Best for quick viewing

Option 2: Stream View

Click “Open in Stream” at the top right to access your recording in Microsoft Stream, which provides additional viewing options, including playback speed control, chapters, and enhanced sharing capabilities.

  • Click “Open in Stream” at the top right
  • Video opens in Microsoft Stream
  • Gives you more options to work with

When you click “Open in Stream,” Microsoft Stream launches right within your browser. No need to switch applications or open a new program.


Microsoft Stream for Meeting Recordings

Microsoft Stream is essentially your organization’s private video platform.  Think of it as your company’s internal YouTube that’s fully integrated with the rest of Microsoft 365. It’s where all your Teams meeting recordings live, but it does much more than just store videos

Learn More by taking our

TEAMS ONLINE COURSE

What You Can Do in Microsoft Stream

Stream transforms your Teams recordings from simple videos into interactive resources.

When you open a recording in Stream, you gain access to a suite of powerful features designed to help you get the most value from your meeting content.

Edit Your Video in Microsoft Stream

Need to polish your recording before sharing it with others? Stream makes it easy to refine your content without specialized video editing skills.

When you open a recording in Stream, you can:

  • Use Clipchamp to edit and enhance your video
  • Trim unnecessary sections from the beginning or end
  • Add or view comments to highlight key moments
  • Check meeting chat that occurred during recording
  • See video settings for playback options
  • Get meeting transcripts for text-based reference

Managing Video Storage Time

Teams recordings don’t have to take up storage space forever. Stream gives you complete control over how long your recordings remain accessible.

To change the expiration date of a recorded Teams Meeting:

  1. Look for “expires” when viewing your recording in Stream
  2. Choose from these options:
  • Make it last longer
  • Pick a specific end date
  • Keep it forever

Pro Tip on Microsoft Stream Expiration Dates:

Setting appropriate expiry dates helps manage your Teams storage space better. Only keep recordings indefinitely if they contain truly valuable information that needs to be referenced long-term.

Who Can Watch the Teams Meeting Recordings?

Understanding who has access to your Teams meeting recordings helps ensure your important conversations reach the right audience while maintaining appropriate privacy. Microsoft Teams has built-in permission structures that determine who can view your recordings based on the meeting type.

By default, your Teams meeting recordings are accessible to:

  • Anyone who was part of your team
  • Members of the channel where the meeting took place
  • Participants who were invited to or attended the meeting

These individuals can find and watch the recording using the steps outlined below. This automatic permission structure saves you time by eliminating the need to manually share recordings with everyone who needs access.

For channel meetings specifically, permissions are inherited directly from the channel’s owners and members list, ensuring that your team’s conversations remain within the appropriate organizational boundaries.

Where to find Recorded Files from a Teams Channel meeting
Recorded Files area within a Teams Channel

Finding Older Channel Meeting Recordings in Files

Can’t find an older Teams meeting recording? No problem! Many users don’t realize that Teams automatically organizes all your channel meeting recordings in a dedicated location, making them easy to find even months after the meeting took place.

Quick Access Through Files

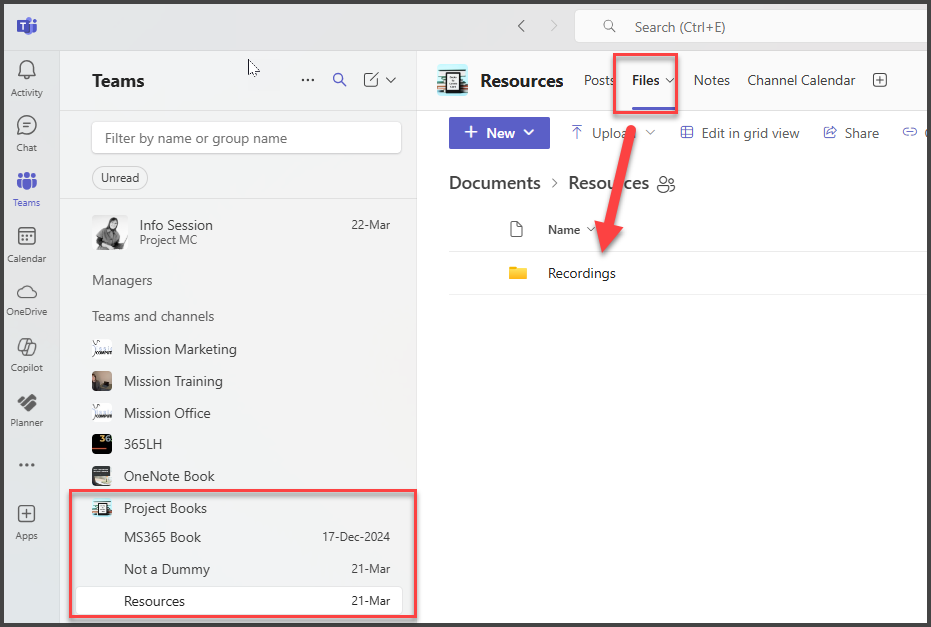
The fastest way to find old recordings is through the Files tab, which connects directly to your team’s SharePoint storage:

  1. Open your Teams app
  2. Go to your Team
  3. Click on “Files” tab at the top of the channel
  4. Look for the “Recordings” folder (Teams creates this automatically)
  5. Browse through the recordings, which are typically named with the meeting title and date

Every channel where you’ve held recorded meetings will have its own Recordings folder, creating an organized archive of all your team’s video content. This folder structure follows the format: “Team name – Channel name/Documents/Recordings”

The beauty of this system is that all channel members have access to these recordings without needing special permissions or links.

Playing Your Recording

When you find your Teams meeting recording, you have several options for viewing and working with it. Teams gives you flexibility in how you access your content based on what you need to accomplish.

  • Quick Play: Click the recording title or thumbnail to watch it right away in Teams. This option is perfect when you just need a quick refresher on what was discussed or want to share your screen with colleagues during a follow-up meeting.

More Options: Click the three dots (…) next to the recording to reveal additional powerful options:

  • Open in Stream: Access enhanced viewing features like searchable transcripts, variable playback speeds, and better sharing options. Stream opens in your browser and provides a more robust viewing experience.
  • Edit in Clipchamp: Make professional-looking edits to your recording without needing video editing expertise. Trim unnecessary sections, add text overlays, or combine with other videos.
  • Play in your device’s media player: Download and watch the recording in your computer’s default video player (like Windows Media Player or QuickTime). This is useful when you need offline access or want to use specific player features.

Need a more powerful way to manage your Teams recordings? Microsoft Stream gives you advanced options for organizing, searching, and sharing your video content.

Accessing Stream Directly

You can bypass Teams entirely and go straight to Stream when you need to work with your recordings:

  1. Open your web browser
  2. Sign in to your Microsoft 365 account
  3. Click the app launcher (waffle menu) in the top left corner
  4. Choose “Stream” from your available applications

Finding Recordings in Stream

Stream offers robust search capabilities that make locating specific recordings remarkably simple:

  • Browse through “All Recent and Favorites” on your Stream homepage for quick access to recently viewed content
  • Use the powerful search bar to find recordings by title, content, or even specific words spoken during the meeting
  • Click “All” to see your complete video library in one organized view
  • Apply filters to narrow results by date, creator, or other parameters

What makes Stream particularly valuable is its ability to search not just video titles and descriptions, but also the actual spoken content within your recordings, perfect when you remember something important was discussed but can’t recall which meeting it was in.

Tips for Success

  • Each channel has its own Recordings folder
  • Recent meetings appear at the top of your list
  • You can access any channel meeting you’ve attended
  • Stream keeps all your recordings in one place

Remember: Whether you use Files or Stream, your recordings are always just a few clicks away!

Accessing Recordings via Microsoft Stream

Accessing Recordings via Microsoft Stream

Stream would have any recordings from any meetings that you attended that were parts of a team channel.

What You Can Find in Microsoft Stream

When you access Stream, you’ll find a complete library of recordings from:

  • Team meetings
  • Chat meetings
  • One-on-one calls
  • Group calls

Helpful Features in Microsoft Stream

Microsoft Stream transforms your Teams recordings from simple videos into interactive resources.

Each recording lets you:

  • Play the video
  • Read the transcript
  • See meeting notes
  • Share with others

Locating Recordings from Meetings held in the Teams Chat

Locating Recordings from Chat-Based Meetings

Need to find a Teams chat meeting recording? We’ll show you the quickest way to find it!

Quick Steps to Find Your Recording in the Teams Chat

  1. Open your Teams chat
  2. Look for the meeting you want
  3. Click the “Recap” tab
  4. Find your recording at the top

That’s it! Your latest recording will show up right away.

Finding Older Recordings in the Teams Chat

Looking for an older meeting? No problem!

  • Click the dropdown menu in the Recap tab
  • Browse through all available recordings
  • Pick the date you want
  • Choose the right recording part if there are multiple parts

Understanding Multiple Parts in a Teams Chat Meeting Recording

Sometimes you’ll see “Part 1” and “Part 2” for the same meeting.

This happens when:

  • Someone stopped and restarted recording
  • The meeting was paused
  • Recording was split into sections

Watching Your Recording

You have two easy options:

  • Quick view: Just hit play right in Teams
  • Full features: Click “Open in Stream”

Using Transcripts in your Teams Chat Meeting

Got transcripts enabled? Great!

You can:

  • Read along while watching
  • Download the text
  • Search for specific topics

Pro Tips

For the best experience:

  • Use Stream for more viewing options
  • Check all parts if a meeting was split
  • Download transcripts for easy reference
  • Look for the “Open in Stream” button for extra features

Managing and Editing Recordings in Microsoft Stream

Managing and Editing Recordings in Stream

Stream is your one-stop spot for all Teams videos. Here’s how to make the most of it!

Using Stream for Training Videos

Teaching or training? Stream helps you:

  • Store course videos neatly
  • Keep content organized by channel
  • Find teaching materials quickly
  • Share videos with students or trainees

Helpful Tools in Stream

Every video comes with features to:

  • Play and pause
  • Edit content
  • Add comments
  • View transcripts
  • Share with others

Advanced Search and Filter Options in Stream

Advanced Search and Filter Options in Stream

Can’t find your Teams meeting recording? Don’t worry! Stream makes it easy to find any meeting recording with just a few clicks.

Important Things to Know

If you did not organize a meeting, then you may not have access to the recording.

For chat meetings:

    • Only organizers can see recordings automatically
    • Other attendees need the organizer to share the recording
    • Ask the organizer if you need access

For channel meetings:

      • All team members can see the recordings
      • No special sharing needed
      • Everyone in the team has access

Easy Ways to Filter Meetings

Use these simple filters to find meetings:

By Time:

    • Last month
    • Last week
    • Custom date range
    • Today

By Activity:

      • Meetings you created
      • Meetings you joined
      • Team meetings

Search Tips

Looking for a specific meeting?

Try these search tricks:

  • Type the meeting name
  • Use keywords from the title
  • Enter the team name
  • Search by project name

Quick Tips for Better Searching

  • Use the time filter first to narrow down results
  • Remember meeting names for faster searching
  • Check if you’re the organizer or attendee
  • Clear all filters to start a new search

These tools help you quickly find any meeting recording. No more endless scrolling or searching!

Conclusion: Tips for Efficiently Finding Your Teams Recordings

Conclusion: Tips for Efficiently Finding Your Teams Recordings

Just keep in mind, was it within a Team and a channel that you belong to or was it in the chat area? And if it was in the chat area, were you the organizer of that meeting or do you have to ask for permission to get that recording?

Quick Guide to Finding Your Recordings

Before you search, ask yourself:

  • Was it a channel meeting?
  • Or was it a chat meeting?
  • Are you the meeting organizer?

Where to Look

For channel meetings:

  • Check the channel’s Files tab
  • Look in the Recordings folder
  • Open in Stream for more options

For chat meetings:

  • Find the chat where the meeting happened
  • Click the Recap tab
  • Ask the organizer if you need access

Finding your Teams recordings is now a breeze! Just remember these simple steps, and you’ll never lose track of an important meeting recording again. Happy watching! 🎥

Call Now Button